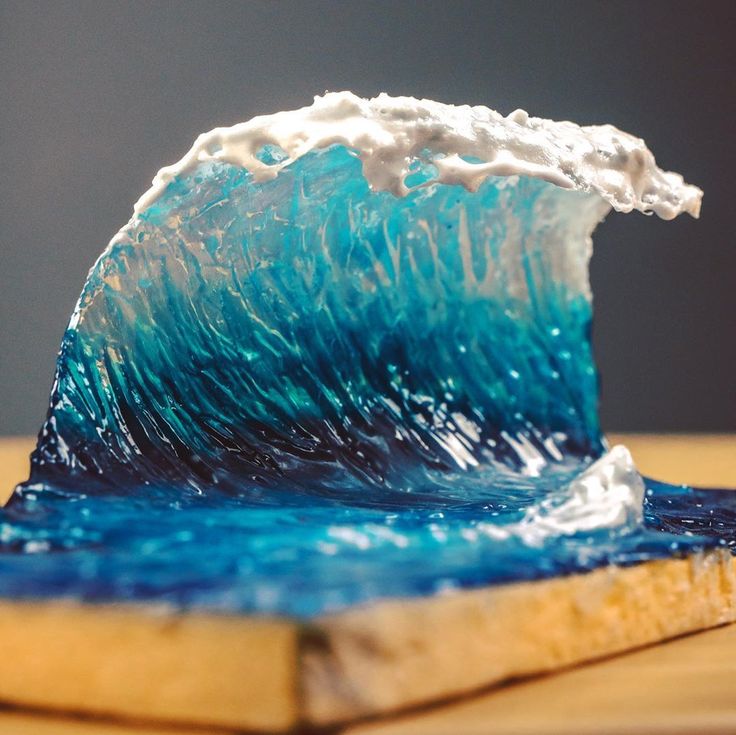
How to Create Stunning Ocean Waves with Epoxy Resin and Liquid Resin Dye
Share

Creating ocean waves with epoxy resin is a popular and mesmerizing technique that brings the beauty of the sea into your art. Whether you’re making a coastal-inspired piece for your home or adding a wave effect to a functional item like a tray or coaster, this technique captures the dynamic motion and vibrant colors of ocean waves. In this guide, we’ll walk you through the process of making stunning ocean waves using epoxy resin and liquid resin dye, even if you’re a beginner.
Materials You’ll Need
- Epoxy Resin Kit: A high-quality, clear epoxy resin that’s suitable for art projects.
- Liquid Resin Dye: Blue, white, and teal dyes to mimic the colors of the ocean. Alcohol inks can also be used for similar effects.
- Mixing Containers: Disposable plastic cups or silicone containers for mixing resin and dye.
- Stirring Sticks: Wooden or plastic sticks for mixing the resin.
- Heat Gun or Torch: Essential for popping bubbles and creating wave effects.
- Protective Gear: Gloves, and a respirator if working in a poorly ventilated area.
- Canvas, Wood Panel, or Mold: Your surface or mold for the resin project.
- Painter’s Tape: To tape off edges and create clean lines if needed.
- Plastic Drop Cloth or Sheeting: To protect your workspace from spills.
Step-by-Step Guide to Creating Ocean Waves with Epoxy Resin
1. Prepare Your Workspace
- Ventilation: Work in a well-ventilated area to avoid inhaling fumes. Use a fan or open windows if needed.
- Surface Protection: Cover your work surface with plastic sheeting or drop cloths to catch any drips or spills.
- Level Surface: Make sure your work surface is level to prevent the resin from pooling unevenly.
2. Prepare the Epoxy Resin
- Measure and Mix: Measure equal parts of resin and hardener according to the instructions provided with your epoxy resin kit. Mix thoroughly for 3-5 minutes, ensuring that the resin is completely combined.
- Divide and Dye: Divide the mixed resin into several smaller containers. Add a few drops of blue and teal dye to one container, and white dye to another. Stir each mixture until the color is evenly distributed.
3. Pouring the Resin
- Base Layer: Pour the blue and teal resin onto your surface to create the base of the ocean. Spread it out evenly using a stir stick or by tilting the surface. This will form the deep water part of your ocean scene.
- Add White Resin: Pour the white resin along the edge where you want the waves to crash. This will form the foam and wave details.
4. Creating the Wave Effect
- Use a Heat Gun or Torch: Gently move a heat gun or torch over the white resin to help it spread and blend into the blue resin, creating the look of waves crashing onto the shore. The heat will also help to pop any bubbles and encourage the white resin to form natural-looking wave crests.
- Create Depth and Motion: To add depth and motion, use a stir stick to drag the white resin into the blue, creating swirls and streaks that mimic the natural movement of waves.
5. Layering for Realism
- Add Layers: For a more realistic effect, consider adding additional layers of resin and dye. Each layer should be allowed to cure before adding the next, giving the impression of depth in the water.
- Enhance Details: Use a small brush or toothpick to add fine details like ripples and foam, giving your waves a more dynamic and textured appearance.
6. Curing the Resin
- Allow to Cure: Let your resin piece cure according to the instructions provided with your resin kit, typically 24-48 hours. Ensure it’s left in a dust-free environment during this time to prevent imperfections on the surface.
- Finishing Touches: Once cured, you can sand down any rough edges and add a final glossy topcoat if desired to enhance the shine and depth of your ocean waves.
Tips for Success
- Experiment with Colors: Don’t be afraid to mix different shades of blue and teal to create the perfect ocean color. You can also add hints of green for a more tropical look.
- Layering is Key: Building up layers of resin can create a sense of depth and realism in your waves. Take your time and allow each layer to cure before adding the next.
- Control Your Heat: When using a heat gun or torch, keep the tool moving to avoid overheating or burning the resin. Too much heat can cause the resin to move too much, disrupting your wave patterns.
- Use Reference Images: Look at photos of real ocean waves for inspiration and to guide your wave placement and motion.
Conclusion
Creating ocean waves with epoxy resin and liquid resin dye is a fun and rewarding process that results in stunning, lifelike representations of the sea. With the right materials and techniques, even beginners can achieve beautiful, professional-looking results. Whether you’re making art for your home or gifts for loved ones, this method brings the serene beauty of the ocean into any space. So grab your resin and dyes, and start creating your own ocean masterpieces!
